Thursday, December 30, 2010

Ginger


Fresh ginger is a regular ingredient in my kitchen­­­­–especially since the temperatures have been dropping by the day here in ever-gloomy weather land. I like to add a bit to stews and soups to warm us up during the winter months. I love the distinct mildly spicy flavor that fresh ginger infuses into dishes. Aside from its culinary use, ginger is also traditionally used for its medicinal properties. It is an excellent remedy for cold symptoms and upset stomach issues.


I recently rediscovered a new way to enjoy ginger in the form of fresh ginger tea. The story goes like this: For the past month I have been seeing an aryuvedic practioner for oil massages and have become curious about aryuveda in general. Aryuveda is the traditional Indian science of health and a system for understanding life. According to aryuveda our body types are composed of one of three different humors called doshas­­–vatha, pitta and kapha. When our dosha is in balance, our agni or digestive and metabolic fire is burning well and keeping us happy and healthy. When our dosha is out of balance, our agni burns slowly and we feel out of balance as well. Imbalances in the doshas disturb our body’s system, leading to aches and illnesses. Apparently ginger fuels the agni, aiding the digestive process and keeping us balanced. So for the past two weeks I have started most my mornings with a cup of fresh ginger tea. I take it on an empty stomach before breakfast. It definitely feels soothing and­­– in any case– is a refreshing start to the day.


Here is a recipe I modified from one that I found in the Yoga Journal:

1 cup water

1-2 teaspoons of grated fresh ginger

1 teaspoon of cinnamon powder

½ teaspoon of cardamom


Boil the water in a small pot and add the spices. Turn off heat and let sit for 5-8 minutes. Pour the tea in a cup using a small sieve to catch the spices. I like to add a bit of lemon juice or milk before drinking. Enjoy!

Monday, November 22, 2010

Lisbon

Sometimes the good things in life come in the form of warm cinnamon-covered pastries. That’s the conclusion I came to after tasting a pastéis de nata, a Portuguese custard tart, from Pastéis de Belém in Lisbon. Pastéis de Belém is located in Belém, a neighborhood on the outskirts of Lisbon and has been in existence since 1837. My dear friend Marianna (aka knower of all things wonderful in Lisbon) took us there last Sunday morning. The pastry shop itself was old fashioned and minimal. The bakery was situated in the back of the shop and connected to a large sitting area packed with people. A long line of eager customers curved out onto the sidewalk in the front. It seemed like the whole of Lisbon had gathered to sip coffee and chat with friends and relatives over platters of pastries. Sitting at a table inside looked like an impossible option so we took our place in line and patiently waited our turn to order. Luckily the line went by pretty quick. We walked away with a dozen delightfully packaged pastéis de natas and headed to a nearby park to enjoy our treats. The tarts were absolutely delicious. G happily devoured three in a row.


I don’t have much experience with baking, but I would like to try my hand at baking pastéis de natas once we move into our new apartment and have a proper oven. In the meantime I found a recipe online that sounds doable. Let me know if you have any recipe suggestions of your own.


The following day G and I took a ferry across the Tagus River to Ponte Finale, a small and lovely riverside restaurant overlooking Lisbon. The ferry dropped us off at the pier and we walked along a narrow path next to the river, passing endless abandoned warehouses before arriving to our destination. The sun was shining so we decided to sit outside to enjoy the weather. The food was fantastic. We stayed for a while after our meal, sipping Portuguese Vinho Verde wine while relishing the view.


Wednesday, October 27, 2010

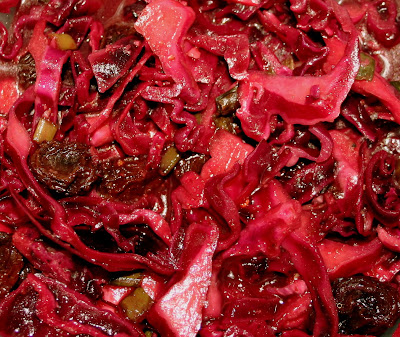
Red Cabbage and Cumin Salad

I love cabbage - and the added benefit is that it's really good for you. Red cabbage is even healthier than white cabbage - as the color indicates. In general, the darker and deeper the color of any fruit or vegetable, the healthier it is - the color signifies a greater concentration of nutritious stuff.

I still haven't been able to master the thin slicing technique (my Serbian mother-in-law slices it paper thin, by hand), but we can live with that. And although I don't particularly like the results of cooked red cabbage, I think it works great in salads.

I stole the idea for this recipe from a local cafe here in Dubai called Organics. This salad was so good, so I came up with a recipe - it came pretty close, and maybe even better than the one in the cafe. It's a great way to introduce some variety and flavor to your more traditional salad, which can become boring.

Ingredients:

1 head (or 2 small heads) red cabbage
1 lemon
2 tablespoons balsamic vinager
1 tablespoon tamari or light soya sauce
4 tablespoons olive oil
1 bunch Green onion
1 handful raisins
1 tablespoon ground cumin
1 inch piece of ginger
1 clove garlic or garlic powder
1 dried red chili pepper (or flakes, or a fresh pepper)
S&P
sesame seeds to garnish

Slice the cabbage. This last time I used baby cabbages, which were divine - they are so easy to work with - I managed a pretty decent slice - and tasted great. Rinse and put in a big bowl.

Grate the ginger and garlic, or finely slice, into the bowl. Finely chop or crush the pepper. Chop the green onion tips. Add all the ingredients to the cabbage. Mix well, taste, and adjust according to your fancy. This gets better the longer it soaks.

The salad goes great with many dishes. We had it last night as a light dinner along with some grilled haloumi cheese, and I had the leftovers today with some chicken breast (which I seasoned with salt, pepper, crushed garlic, lemon zest, thyme, and olive oil, and grilled in the oven for about 20 minutes)


Thursday, October 21, 2010

Turmeric


Turmeric is one of the spices that I use most when cooking. As a child I remember that there were two spices always at hand in our kitchen: the first was saffron and the second a bright yellow powder, which I later discovered was called turmeric or zard choobeh in Farsi, Whenever my mother, aunts or grandmother fried onions they would add turmeric to the pan. I find myself doing the same when frying onions as a base ingredient for almost all my meals. I recently read that the combination of turmeric and onions can help prevent colon cancer (something about a chemical reaction between the two). Turmeric has also been traditionally used for medicinal properties as an anti-inflammatory agent. Read more about the benefits of turmeric.


Its October here in the Netherlands. The weather has been getting wetter and colder by the day. After an afternoon spent riding around the city on my bike with only a flimsy umbrella to protect me from the rain, I decided I needed a hot soup to warm my body and soul back to life. I made red lentil soup and used turmeric as a base ingredient.


Red Lentil Soup

1 -3 tablespoons Virgin Olive Oil (for cooking purposes)

1 large onion (chopped)

1 clove of garlic (minced)

1 ½ tabled spoons of fresh ginger (grated)

2 teaspoons of Turmeric

1 teaspoon of Paprika

1 teaspoon of Cumin Seeds

2 carrots (grated)

5-6 medium sized tomatoes (skinned and chopped)

1-½ cup red lentils

5-6 cups of chicken, beef or vegetable stock (I used chicken)

1-2 dried small dried chili peppers (optional and depending on how spicy you like it)

2 Bay Leaves

Sea Salt and Ground Pepper for taste

Greek Yogurt


Skinning the tomatoes:

Place the tomatoes in a large bowl. Boil water and pour over the tomatoes in the bowl until the tomatoes are covered in water. Let sit for 2 minutes. The tomato skins should start to become loose. One by one take the tomatoes out of the water, peel away the skin and chop.


The Soup:

In a non-stick saucepan heat the olive oil. Add the chopped onions and turmeric. Mix well and let cook for 3 minutes. Add the carrots, garlic, ginger, paprika and cumin seeds and let cook for 4 minutes. Add the tomatoes and mix well with other ingredients with wooden spoon (I always use a wooden spoon). Let the mixture cook for another 5 minutes. Add the stock, red lentils, bay leaves and dried chili peppers. Season with sea salt and ground pepper and stir. Bring to a boil; cover the pot and let it simmer for 20 minutes. Serve in bowls with a tablespoon of Greek yogurt on top.

After dinner I relaxed with a recipe for a turmeric mask I found in the October 2010 edition of the Yoga Journal. My skin feels really soft and I am a happy girl.


Turmeric Mask:

Mix 2 tablespoons of plain yogurt (I used the Greek yogurt from dinner) with 1/3 tablespoon honey and a pinch of turmeric. Spread over the face evenly and enjoy!

Sunday, June 20, 2010

Make Your Own Granola

I finally made my own granola! And you know what, it was so easy. And totally worth it because you can control the sweetness and put in your favorite ingredients (many granola cereals have tons of sugar). AND, according to my personal food taster, it was better than any cereal we ever bought. OK, he is easily pleased, but seriously, it was good! The maple gives it a smoky flavor, and the sweetness was just right.

Only takes an hour, with just a few minutes of preparation:

Ingredients:
3 cups of Rolled Oats (I like the Jumbo ones)
1/2 cup raw almonds, chopped (or other nuts)
a handful raw sunflower seeds (or other seeds)
1/2 cup real maple syrup (or you could use honey - use more if you like it sweeter)
1/2 cup coconut oil (or other vegetable oil, but this is by far the healthiest)
1/2 cup dried fruits (i used golden raisins, goji berries and dried cherries)

Obviously you can really change this recipe around, depending on what you have in your kitchen. But here are the basics:

Mix the oats, chopped almonds (I chopped them myself, takes about 5 minutes) and seeds with oil and maple syrup until well coated. (Coconut oil is one of the healthiest oils, especially for cooking because it can withstand high temperatures.) Spread evenly on a big baking sheet/tray. Bake at 120-130 C for one hour. Toss it around with a spatula every 15-20 min to make sure it's evenly cooking. When it's out of the oven, add the dried fruit - and that's it!

We had it for breakfast with soy/rice milk or layered with yogurt+ricotta and homemade raspberry jam. It also makes a lovely, personalized gift.


Soon...gotta try granola bars.

Thursday, June 17, 2010

Karkade


Karkade (aka Hibiscus or "flor de Jamaica") was used to make the drink of the Pharaohs of Egypt, and still a popular drink in the Middle East and North Africa (as well as Latin America) today.

They are those pretty red flowers that tropical fairies bathe in. The flowers have a sweet and tart taste when steeped in water. You can serve the tea hot or cold, but we prefer it cool and sweet. Hibiscus is also really good for you! It is caffeine free, rich in Vitmin C, and is known to help lower cholesterol, act as natural body refrigerant, aid in digestion, among other things...


Dried Hibiscus Flowers

The husband is in charge of making Karkade in our house. Here is his recipe:

Add 1 cup dried flowers to 1 liter (4 cups) water, bring to a boil and simmer for 5 minutes. Sweeten with honey to taste (it's naturally a bit sweet and tart; he puts about 3-4 soup spoons) Let it cool, then drain into a pitcher and put in the fridge. Perfect for a hot summer day...

Btw - husband is also looking for a few staple recipes to become good at - so if any one out there got some simple, "manly" recipes in mind (something other than goulash or sauteed potatoes), shout out!

Enjoy

Wednesday, June 16, 2010

Baked Seed Rounds


Funny name, I know. It's what I though when I found this recipe in a Health magazine. But, after tweaking it up a bit, it came out so delicious that I had to write it down before I forgot. They were called "seed rounds", it's something like a spicy baked falafel. Oh and the hubz loved it, which always makes me happy.

Ingredients:

1 can white beans or chick peas, drained and rinsed
1 clove garlic, smashed
1 big handful of fresh chopped cilantro
1 small hot pepper, chopped
1 tablespoon sunflower seeds, crushed
1 tbsp sesame seeds
1 tbsp pumpkin seeds
1 tsp cumin
1 tsp chili powder
2 tsp turmeric
1 egg
1/2 cup whole wheat flour (optional)
S&P
olive oil

Smash all the ingredients together in a big bowl with a hand blender. (add a bit of whole wheat flour if you think it's too gooey.) Form into 4 medium sized balls and lay in a baking dish drizzled with olive oil. Brush the tops with oil, and put into the oven on 200C, on the top rack, for about 15 min on each side (flip over when crusty and brown on one side).

Serve with a simple tomato sauce or greek yogurt and spinach, and green salad. I'm going to try this on my indoor lean-griller next time - it will be something like a bean burger.

Friday, January 15, 2010

Chocolate-Banana Muffins


The other morning, I woke up feeling the need to bake something. I had 3 soft bananas, on the brink of going too soft, so I decided to make these banana muffins. They came out really good, easy and quick, so I thought I'd share them with you.

You can mix and match the recipe. I also thought about doing it without cocoa, and adding dried cranberries instead. Poppy seeds, or other crushed nuts instead of peanut butter could also be nice...just see what you have in the pantry :)

Wet ingredients:
3 bananas
1 tablespoon vinegar (or one egg)
2 tablespoons crunchy peanut butter
1/4 cup coconut oil (or butter/other oil)
1 tsp vanilla extract

Dry ingredients:
1 1/2 cups flour
1/2 cup - 1 cup sugar (depends how sweet you like it, I used a mixture of packed brown sugar and caster sugar) or 1/4 cup honey or agave syrup
1 tsp baking powder
1 tsp baking soda
1/2 tsp salt
1/2 cup dark unsweetened cocoa powder

Set oven to 175 C (350 F).

Mash up bananas in a large bowl with vinegar, oil, peanut butter, and vanilla. In a separate bowl mix together the dry ingredients. Add dry ingredients to banana mixture. Don't over mix, just incorporate the dry into the wet - keeps it fluffy. Spoon into lined muffin tin, and bake for 20 minutes.

OK first one was a cheat, but it's not so bad, especially if you make it yourself and therefore control the ingredients...Enjoy it on the weekend with a coffee (which I only have on the weekends), or decorate with some light lemon icing and bring to a party!